Rewrite
The page was partially rewritten based on a German manual I wrote between 2008-2012, as well as the work PCI's team has put in their German manual over recent years.
Auto-Scan
The Auto-Scan function allows you to run an entire diagnostic protocol across all control modules in a specific vehicle. It gathers information about the installed control modules and their status. This does include part numbers, component identifications, software and hardware information, coding values and event/fault codes (DTCs).
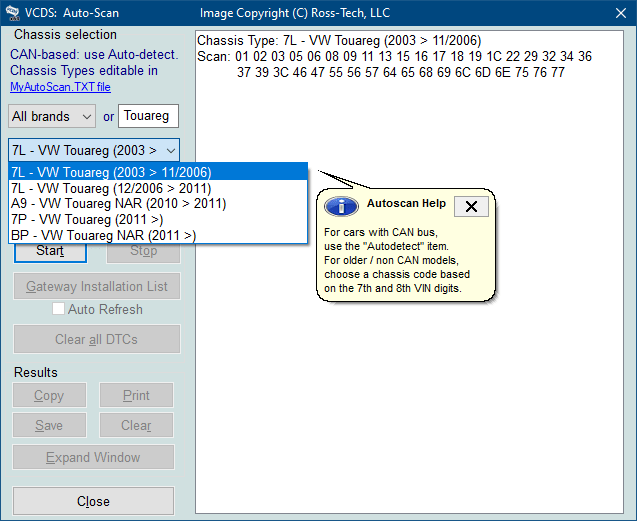
Auto-Scan Dialog during Vehicle Selection
Best Practice
It is recommended to perform the Auto-Scan prior to beginning any work on a vehicle and to save the results either locally on your computer or (i.e. in a workshop environment) synchronize them to a server.
Vehicle Selection
Automatic Detection
All vehicles that utilize a modern Diagnostic Interface for Databus (J533) and are able to provide a Gateway Installation List, allow VCDS to perform an Auto-Scan based on that installed list of control modules. By doing so, it is ensured that only modules listed1 are actually queried.
The Automatic Detection is pre-selected, so you can always directly Start the Auto-Scan without any further input.
Tip
Use the Automatic Detection for a much quicker Auto-Scan (where available). In many cases, even if you manually select a model from the list, VCDS will still perform the Automatic Detection for better and quicker results.
Manual Selection
Vehicles that do not support Automatic Detection must be chosen from the dropdown menu. To filter the available entries, select the brand and/or enter the 7th and 8th digit of the VIN. So if the VIN is WVGZZZ5NZ8W001234 you should enter 5N. Next [Start] the Auto-Scan, VCDS will connect to each control module based on the address list for the selected model/entry.
Info
An Auto-Scan based on a manual selection will always query all possible addresses for a selected model. In most cases this does include addresses/modules which are not necessarily installed in the specific car you are scanning. This is normal, VCDS will wait for the module to answer and once timeout exclude the module from the final result.
Modified Selection
To add special or personal entries to the list of available models, you can edit the MyAutoScan.TXT (located in the installation folder (1)) by simply clicking on the blue link MyAutoScan.TXT file in the Auto-Scan menu. This will open the file in your default Text editor (like Notepad) and allow you to create a custom profile for a personal vehicle or other special applications.
- typically
C:\Ross-Tech\VCDS\
; This file has the same format as the main AutoScan.txt file,
; but it's intended to contain custom entries for your own car(s)
; that will be displayed before the standard models in the selection
; box on the Auto-Scan screen.
;
; Chassis Code (max 3 characters),
; Description  (max 15 characters),
; Comma-separated list of addresses (max 125 addresses)
; Maximum 250 chassis types (total of both files)
;
; Example:
; 01,My Car,01,03,15
;
; Remove the semi-colon from the above line to see how it works.
; ... or add your own using that format
Once you have saved your changes/additions, close the MyAutoScan.TXT file and return to VCDS. You may need to [Close] and re-open the [Auto-Scan] menu for your changes to be loaded. To locate your new entry and start the scan, follow the instructions for a [Manual Selection].
Scan
Start & Stop
The [Start] button begins the Auto-Scan. Beware; this process can take several minutes.
While the scan is running, VCDS will cycle through the Open Controller and Fault Code screens for each controller before returning to the Auto-Scan screen. On newer control modules which have different Hardware and Software part numbers, Auto-Scan includes the Hardware Part Number as shown in the screenshots. The AutoScan also shows the applicable ROD files (used by UDS modules) and Label Files.
Once the scan completes, double-clicking on any of the Control Modules highlighted in RED will open the Fault Codes screen for that controller and allow you to clear the codes.
The [Stop] button stops the AutoScan.
Aggressive Mode
The UDS Aggressive Mode box is checked by default. In this mode VCDS will try to retrieve all fault codes, even ones that may not be shown by the factory scan tool, depending on which mode the factory technician is using. You can uncheck this box to more closely correlate your results with what would be seen by the factory scan tool in "Self Diagnostics" mode compared to their more aggressive checking in "Guided Fault Finding" mode.
Tip
We do recommend to leave Aggressive Mode active in the Auto-Scan and instead determine the viability for each code via the individual control module fault code menu. See Fault Codes for more details on this subject.
Freeze Frame Data
The Display Freeze Frame Data checkbox adds Freeze Frame data for Fault Codes on control modules using the KWP-2000 protocols. Note: Not all control modules support this freeze-frame data. As a rule of thumb, cars which were re-designed after 2003 will likely have some control modules which support it, and older designs will not. There's no harm in leaving this enabled in any case. However, un-checking it can make the results less cluttered in a scan which contains many fault codes.
See Fault Codes for more details on this subject.
Installation List
Automatic Refresh
Clear All
Use CAN Command
Results
Copy, Print, Save and Clear
Session Log
Expand Window
Close
Close will bring you back to the main menu. All unsaved results will be discarded.
Tip
If you keep working on a vehicle, start a Session Log prior to closing the Auto-Scan function.
-
In addition VCDS may query additional modules where needed, even though they may not be part of the installation list received from the vehicle/gateway. ↩